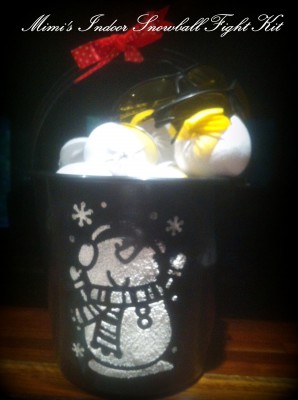
I made 9 of these for under $10 each for my nephews aged 2-12.
You would not believe what a hit they were!
These are not an original idea, but I do think my method of making the snowballs, and the packaging, makes them fairly superior to every other version I've seen ;0)
For each kit, with a generous number of snowballs, you'll need:
7-10 pairs of really cheap white ankle socks. Those ones the girls like that just brush the tops of their shoes. I got mine on eBay and bought 63 pairs for a stupid price. They worked out at about .65c a pair. Each pair gives you two snowballs, remember. I found with experimentation, that the ankle socks, done my way, are the perfect snowball size.
A couple of handfuls of polyester stuffing....the stuff you use for toys and cushions. I bought a bagful, and it was more than enough.
1 plastic bucket. The black really shows off the stencilling.
Spray snow...known as Santa Snow here.
Cute stencil...mine came from the discount store and I got two different snowmen for $2.
Sticky tape.
Spray fixative to prevent the stencil rubbing off. I had one already, called CrystalKote. You spray it on and it sort of coats the stencilled figure so it can withstand more wear and tear. It's not essential, but does help with preserving the look of the snowman.
A packet of elastic bands. I mean the cheap things you find in the stationery section for under $1 for hundreds.
White cotton and needle.
If desired, you can buy inexpensive 'safety goggles' on eBay. Again, mine worked out at under $1 each, and just added a bit of extra fun to the gift.
Then just:
Tape the stencil to the bucket and spray liberally with the Santa Snow. Allow to dry for a minimum of 30 minutes and up to overnight. When I did all of mine together, I was letting them dry for 30 minutes, and removing the stencil for the next bucket, scraping the excess Santa Snow off the surface of the stencil with a knife, in between uses. I'd then let them 'set' overnight, before spraying with the fixative.
Turn all of the socks inside out, and set yourself up with the stuffing, the elastic bands and the socks.
Grab a generous handful of stuffing and push it into the toe end of the ankle sock. You should have half stuffed sock, half not stuffed. Wrap an elastic band securely around the top of the stuffed section to seal it off, and fold the remaining sock (the heel end) back over the newly created snowball. You'll now have a snowball with right-side-out sock covering it, with a hole at the 'top' end. Use your needle and thread, to run a row of quick stitching around the rim of the open end of the sock. Now gently pull it to gather the sock opening, and close the hole. Use a couple of quick stitches to seal the edges of the top of the snowball, and secure well with a few backstitches.
The first one took me ten minutes to work out the best method and yes, I tried machine stitching....too hard and too fiddly. Hand stitching is quickest, believe me, and results in a perfect ball shape. By the 45th one, I was churning them out in under 2 minutes :)
Load your snowballs into the bucket....14-16 seems optimum for fun and good presentation :)
Add the safety goggles by hooking them onto the handle of the bucket, if using them, add a ribbon, and you're done.
Awesome gifts for very little money and a little effort. The best kind!
Merry Christmas!


